CategoriesProgramming

Cloudbuild with Android – Using Encrypted Environment Variables

Hi there! At my current work, we had a problem with our CI/CD, and we started to look for alternatives. We checked out various platforms like CircleCI, Bitrise, and others. Still, the process to ask the upper-level management to add this as providers was a bit slow and tedious so, since we already had GCP as a provider, we decided to try GCP Cloudbuild.

Cloudbuild is an infrastructure that allows you to run builds for your projects. The price was reasonable, so we decided to start investing time on it to move our Android CI/CD all to cloudbuild.

As first we started looking for some previous experience on the internet and found two excellent articles about it, those articles will be linked below. Nevertheless, those articles required a certain knowledge of Docker, CloudBuild, and other technologies that I didn’t have.

So I started learning about it to understand these articles better. What I wanted to achieve first was to read an encrypted environment variable. With this goal in mind, I started my quest.

Note: Articles in which this post is based.

https://ryanharter.com/blog/cloud-build/

https://medium.com/dailymotion/run-your-android-ci-in-google-cloud-build-2487c8b70ccf

First, let’s enable GCP KMS

What we need to do first is go to the GCP console, create our new project, and enable the KMS. You must go to Security → Cryptographic Keys.

Note: KMS stands for Key Management Service.

Sidebar menu which shows the cloud build KMS

Creating a Keyring and a Criptokey

A Keyring can hold various CryptoKeys. To create a Keyring, you need to use the following command:

“yourkeyringname” is the name of your Keyring, and you should replace it for your what suits best for you, and the flag –location=global means that this Keyring is available in all regions of your project.

Now that we already created a Keyring, let’s create our new CryptoKey, for that we’re going to use the next command.

“KEYNAME” is the name of the key you want to create, and the–keyring flag is to indicate to which Keyring it’s going to belong since we’re using as an example “yourkeyringname” it will belong to it.

Encrypting the variable

To encrypt our variable, we must store it in a plain text file and then create a ciphertext file from that one. For that, we’re going to use the next command.

What this does for you is to encrypt your my_variable.txt file and convert it to my_variable_encrypted.txt using your Keyring and your cryptokey. After that, you need to create a base64 from your encrypted variable, and that can be achieved using the next command:

If you’re using macOS you can use:

In Linux, the command is:

The result of this process is going to be something like this:

Note: This is an example. Your base64 is not going to be the same.

Now let’s store this base64 until we finish the next step.

Creating our AndroidBuilder

In this step, we’re going to create our new Docker Image and pass to it our secret as a Build Argument. If you never created a Dockerfile before, probably you want to learn about it before continuing with this topic.

What we do in this Dockerfile is:

  • Obtain the javac builder from GCR (Google Container Registry).
  • Update the system.
  • Download the dependencies.
  • Set our “build arg” with the name SECRET.
  • Set the ANDROID_HOME as an environment variable.
  • Copy our gradle-build script(This is a little script that helps us to store the gradle cache so the subsequent builds can be faster).
  • Download the android sdk tools, set our tools as an environment variable, and finally install the Android SDK.

This is the gradle-build script that is mentioned in the Dockerfile.

Note: This Dockerfile and gradle-build script are based on this article that helped me a lot. I only added a few instructions, the latest android platform, build-tools, platform-tools, and the ARG SECRET line.

If you’re a more advanced user of Docker and GCP, you can use the community cloud builder, which can be found here. I wanted a simpler proof of concept, so the previous one was the one that fit best for me.

As the last part of this step, we’re going to create a cloudbuild.yaml, which is going to build our container and upload it to the Google Container Registry. In this cloudbuild.yaml file, we’re going to execute a command which builds the container. There is where we’re going to run our Android project. In this cloudbuild.yaml, we pass our secret and use the base64 that we generated before, here’s how it’s going to look.

In this file, we’re building a Docker container and passing our secret as build arg. You can see that we’re using a double dollar sign to escape the cloudbuild substitutions, which are, for example, the $PROJECT_ID, then we’re declaring that we’re going to use the secret at the end of our cloudbuild.yaml. Remember to replace “yourprojectname,” “yourkeyring,” “yourcryptokey” and your base64 in the previous file.

Finally, we use the following command to build it and send it to the Container Registry.

Important: If you’re getting an error because the Container Registry doesn’t have permission to decrypt you must go to your GCP console, Select Cloudbuild, go to configuration and copy your service account email, go to Security → Cryptographic keys → Select your key → Click the add member button in the right panel, add it as a member and select the role of decrypt cryptographic keys.

The cloudbuild file in our android project

Now that we created our container to run our Android project, what we’re going to do is to create the cloudbuild file of our Android Project.

First, we’re going to create a couple of GCP Storage Bucket, and the Storage Buckets are object storages provided by the Google Cloud Platform. In other words, it helps us to store things. In our case, it will be helpful for our Gradle cache and apks.

To create it, we’re going to open up the terminal and type the next command.

In our cloudbuild.yaml we’re going to describe the following steps:

  • Copy our cache into our GCP Storage Bucket using the gsutil image from Google Container Registry. The GCP provides this image, so we don’t have to build our own.
  • Run a KtLintCheck task on our previously created AndroidBuilder.
  • Run a detekt task in our AndroidBuilder.
  • Run our unit test always on our AndroidBuilder.
  • Assemble our Apk.
  • Store the cache.
  • Store our apks in a storage bucket.
  • Finally, we set the timeout for the build to 1200 seconds.

Note: Ktlint is a linting tool for Kotlin, and you can read more about it in this awesome article by Nate Ebel. On the other hand, detekt is a static code analysis tool for Kotlin, and you can read more about it here.

Set up the triggers.

Now we want to set-up the build triggers, so each time we push a branch, we can run our build to verify that everything is fine. To do this, we need to go to console.google.com, select our project, go to the navigation menu, select cloud build, triggers, connect our repository if you haven’t already, and then click the create trigger option. It looks like this.

Create Trigger in GCP form

This is a trigger that we want to run when a new feature branch is pushed to the repo. To test it, you need to push a new branch to the repo and check the GCP console history. If everything went well, you’re going to see something like this.

Successfully worked trigger

You can also try your builds locally using cloud-build-local.

Test your build locally

Pushing to GitHub to trigger the build can be annoying and a slow process. If you want to test your build, you can test it in your computer using cloudbuild local and running the following command:

Note: You need to install first cloud-build-local with the following commands.

You can read more about it here.

Where do we go from here

This was a proof of concept that I used to learn new things and to propose it to the DevOps team, in my job, I wanted to help them to help our Android team as I mentioned before this can be hugely improved so feel free to improve it or to use the community cloudbuilder if that fits your needs.

Ryan Harter has a series in which he talks about how to increment the build numbers and how to store the build cache. If you want to go even further, play around with the community builders.

What you can take away from this

If you’re looking for an alternative to circleCI, bitrise, or others, and you’re not afraid of a terminal and learning new things (Assuming you’re like me and didn’t know anything about cloudbuild) cloudbuild is cool. Surely it doesn’t have the beautiful UI/UX of one Continuous Integration provider. But it does very well the job. So it depends on your needs.

That’s it

If you have any questions, suggestions, or improvements, please leave a comment ?. You can also reach me via Twitter @gvetri18.

CategoriesDartFlutter

? Taking a picture and selecting from gallery in Flutter

Hi there! I’ve been working in an App that requires to take a picture from the app or pick it from the gallery. And here’s what I learned about it. There are many ways to take a photo using the camera. This time we’re going to use the ImagePicker plugin.

Let’s start with the dependencies.

As the first step, we need to add new plugins to our dependencies. In our pubspec.yaml we’re going to add the next plugins:

  • Camera which helps us to work with the device’s cameras.
  • path_provider gives us the correct path to store images in our devices.
  • image_picker helps us with the photo selected from the gallery.

After we add it to our pubspec.yaml, it’s going to look like this.

name: fluttercamera
description: A Flutter project that takes a picture and shows the preview.
version: 1.0.0+1

environment:
  sdk: ">=2.1.0 <3.0.0"

dependencies:
  flutter:
    sdk: flutter
  camera:
  path_provider:
  path:
  image_picker:

  cupertino_icons: ^0.1.2

dev_dependencies:
  flutter_test:
    sdk: flutter

flutter:

  uses-material-design: true

Adding a min Android SDK.

The Flutter camera plugin only works with an sdk 21 or higher in Android. So we need to open our build.gradle file located at android/app/build.gradle and search for the line minSdkVersion. Lastly, we need to upgrade our min sdk version from 16 to 21. If you don’t know anything about android development, this made the app available only from Android OS Lollipop or later.

This is how it should look like after doing that change.

Let’s create our first screen!

Let’s create our PhotoPreviewScreen, which is a StatefulWidget. In the beginning, it should look like this.

class PhotoPreviewScreen extends StatefulWidget {
  @override
  _PhotoPreviewScreenState createState() => _PhotoPreviewScreenState();
}

class _PhotoPreviewScreenState extends State<PhotoPreviewScreen> {
  @override
  Widget build(BuildContext context) {
    return Scaffold(

    );
  }
}

Now we’re going to create a Scaffold with a centered column that is going to show our image preview after we pick it from the gallery or take a picture from the camera. As of the last step, we’re going to add a floatingActionButton, which is going to show the selection dialog.

class PhotoPreviewScreen extends StatefulWidget {
  @override
  _PhotoPreviewScreenState createState() => _PhotoPreviewScreenState();
}

class _PhotoPreviewScreenState extends State<PhotoPreviewScreen> {
  @override
  Widget build(BuildContext context) {
    return Scaffold(
      body: Center(
        child: Column(
          mainAxisAlignment: MainAxisAlignment.center,
          children: <Widget>[
            _setImageView()
          ],
        ),
      ),
      floatingActionButton: FloatingActionButton(
        onPressed: () {
          _showSelectionDialog(context);
        },
        child: Icon(Icons.camera_alt),
      ),
    );
  }

Great! Now you’re probably asking what the _setImageView() and the _showSelectionDialog(context) do. The _setImageView() is a method that returns a Widget in case the Image we pick from the gallery or take from the camera is null. We’re returning a Text Widget that has the following text “Please select a picture.”

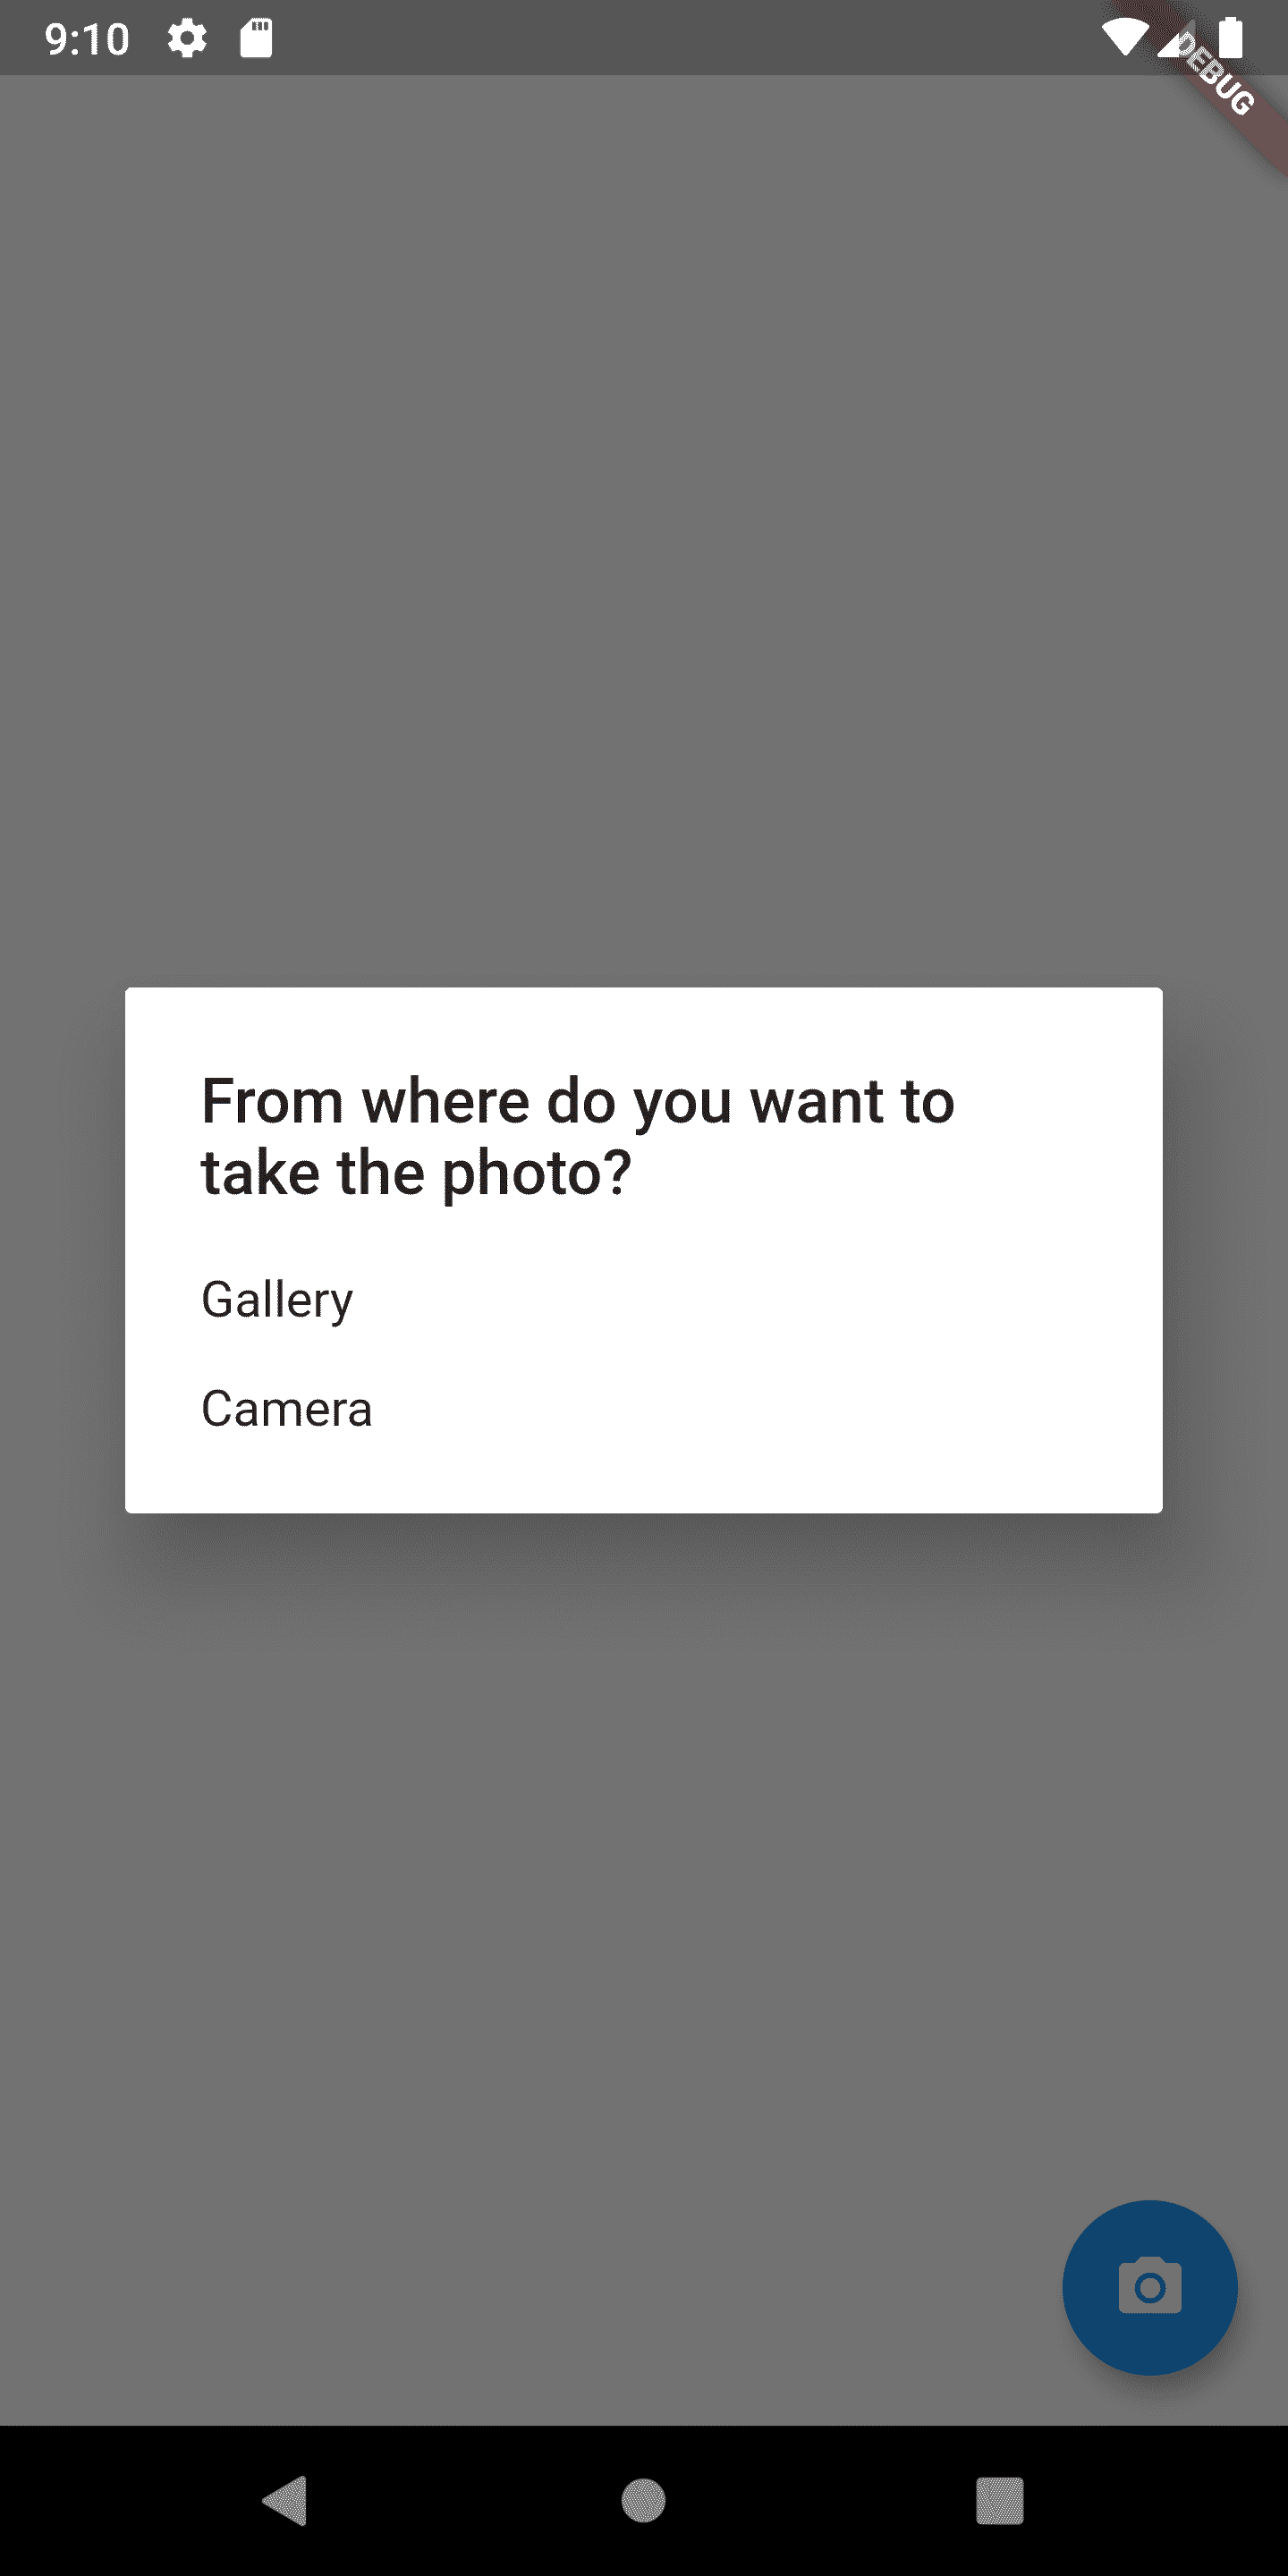
The_showSelectionDialog(context) is going to show a dialog with two options, take an image from the gallery or the camera. Let’s start creating this one. This method should use the function showDialog() and pass to it the context and a builder who is going to create an AlertDialog with a title and two options.

In the AlertDialog constructor, we’re going to pass as content a SingleChildScrollView which is a Widget that helps us to scroll the list, as a child of this Widget we’re going to pass a ListBody with two children, those children must be a GestureDetector to detect when the user touches the text.

Each GestureDetector child is going to be a Text Widget with the “Gallery” text and “Camera” text, respectively, and each onTap() method is going to be _openGallery() and _openCamera(). Methods that we’re going to create in a while. Your _showSelectionDialog(context) should look like this.

Future<void> _showSelectionDialog(BuildContext context) {
    return showDialog(
        context: context,
        builder: (BuildContext context) {
          return AlertDialog(
              title: Text("From where do you want to take the photo?"),
              content: SingleChildScrollView(
                child: ListBody(
                  children: <Widget>[
                    GestureDetector(
                      child: Text("Gallery"),
                      onTap: () {
                        _openGallery(context);
                      },
                    ),
                    Padding(padding: EdgeInsets.all(8.0)),
                    GestureDetector(
                      child: Text("Camera"),
                      onTap: () {
                        _openCamera(context);
                      },
                    )
                  ],
                ),
              ));
        });
  }

Now your app should show a Dialog like this one.

Let’s use that plugin.

Now let’s add the logic to our _openGallery(context) method. What we’re going to do first is create a field called imageFile, which is going to be a File object in our _LandingScreenState class. After creating that, we’re going to use the ImagePicker function ImagePicker.pickImage() passing to it the enumImageSource.gallery This function is asynchronous, so we’re going to add the reserved keywords async and await, later we’re going to save that variable and assign it to our property. As our last step, we’re going to call the setState() method to notify that the state has changed.

The function _openGallery(context) should look like this.

void _openGallery(BuildContext context) async {
    var picture = await ImagePicker.pickImage(source: ImageSource.gallery);
    this.setState(() {
      imageFile = picture;
    });
    Navigator.of(context).pop();
  }

The _openCamera(context) function it’s almost the same. The only thing we need to change is the source, instead of ImageSource.gallery we’re going to use ImageSource.camera. This simplicity is what I most liked from this plugin, that was so simple.

Showing the preview

Remember the _setImageView() that was at the beginning? Well, we’re going to verify that the field imageField is not null to return an Image Widget. If the image field is null, we’re going to return a Text Widget.

This is the result.

Widget _setImageView() {
    if (imageFile != null) {
      return Image.file(imageFile, width: 500, height: 500);
    } else {
      return Text("Please select an image");
    }
  }

This is how your app should look after you select a image from the gallery.

That’s it

I hope you liked it! If you’re interested in more Flutter/Dart articles, you can follow me on social and say hello!.

Instagram.

Twitter.

? Click here to join the newsletter

CategoriesProgramming

What is a unit test

You probably seen in those job offers, “Experience with Tests and TDD.” But if you’re like me you probably have no idea about tests, you heard about them, and you know that the good developers are using it. But, what are they? how they work?

? Let’s start with the test

When a QA comes to me and asks me if I’m confident about what my code is supposed to do, I always answer no, and that’s because I know I could mess it up. It’s not because I don’t trust my coding skills. It’s because I’m human, and we made mistakes. That’s why I started learning about testing because an excellent test suite can help you to catch the bugs that you’re going to introduce.

A test determines something; in our case, we want that our code goes as we planned. In my vague words, a test is a code that you write to verify that the “production” code you wrote is doing what is supposed to do.

?‍??‍?The unit

An individual thing or person regarded as single and complete but which can also form an individual component of a larger or more complex whole.

Taken from lexico.

In our case, a unit can be a class or a function which can group to create an App. We can test our units to be sure that each unit does what it’s supposed to do, and if we do that, we’re doing unit testing.

?‍??‍? Testing the unit

Let’s say we are building a shiny, never made before, unique app called calculator. In this app, we have a function called sum(), which realizes an addition of two numbers. In Kotlin, it will be.

fun sum(int a,int b) : Int {
    return a+a;
}

Then we jump into making our UI because the UI is fantastic, and I love to make the UI, and when we run the app and start testing it, we are surprised because the sum isn’t working. Why isn’t this working? The parameters are a and b. Trust me, this thing happens.

There’s a problem if your build times take some time. You probably know that a full compilation time can break your productivity flow. I hope you’re not like me who get distracted easily and forget what I was doing. Unit testing can help us to solve these two problems because the tests verify that the code is doing what it’s supposed to do. Unit tests run faster than compiling the app and manually testing it, so let’s create our first test.

Almost every language has its unit testing frameworks. You can check your language unit testing framework here. In this case, I’m using Kotlin, so we’re going to use JUnit.

A unit test looks like this and, by default, lives in your test folder.

    @Test
    fun calculator_sum_shouldReturnTheSumBetweenTwoParameters() {
        //Given
        val calculator = Calculator()
        //When
        val result = calculator.sum(2, 1)
        //Then
        assertEquals(3,result)
    }

Analyzing the anatomy of these tests, we can observe the next things:

  • The @Test annotation which indicates that is a Test.
  • The name of the function which indicates [Unit_WhatWeAreTesting_ExpectedBehavior].
  • The body of the test.

The test should follow the Arrange-Act-Assert or the Given-When-Then Pattern. I like the given, when, then pattern because it reminds me of the user stories. And when you can get easily distracted it helps you well! Let’s talk about that pattern!

  • Given: In this section, the objects which we’re going to need are created.
  • When: Here, we call the method to test.
  • Then: Finally, in the last section, we do the assertions.

Alt Text

I’m using Intellij Idea, so there’s a play button close to that test, we click on it, and there’s a message indicating that the test failed.

Alt Text

Our test failed because our function is returning the sum between our first parameter ?‍♂. Now we can change our function to the following and it will pass!

fun sum(int a,int b) : Int {
    return a+b;
}

Alt Text

Amazing. I must admit now the green has become one of my favorite colors since it’s the color that the tests show when it passes!

Kotlin Note: In Kotlin, we can use backticks to wrap the name of the test so it can be more readable!

@Test
    fun `calculator sum should Return The Sum Between Two Parameters`() {
        //Given
        val calculator = Calculator()
        //When
        val result = calculator.sum(2, 1)
        //Then
        assertEquals(3,result)
    }

? The pyramid of testing

We already saw what a unit test is, but there are more types:

  • Unit Test, as we mentioned before this test only the subject.
  • Integration Test verifies that two or more units are working together as they should.
  • End to End Test verifies that all the units are working together as they should. The end to end test in the case of Android includes UI testing.

Since we have three types of testing, we need to split them reasonably. All can’t be End to End Test of Integration Tests. And fortunately, there’s an image which explains very well how we should distribute our testing, and it’s called the pyramid of testing.

Alt Text

The pyramid of testing was created by Mike Cohn in his book, Succeeding with Agile. He states that the unit tests should be the base, then the Integration Tests, and finally the End to End Tests.

? More benefits of testing

When you have a test suite, it works like a fallback network that can help you to avoid introducing new bugs when you are creating a new feature or refactoring the code. Also, your tests can help future developers who came after you to understand more what a feature is doing because the test is the best documentation.

That’s all for now! I hope you enjoyed this post. If you like it, don’t forget to share it with your friends and coworkers so they can know more about testing.

Get in touch

Chat with me on:

? Twitter

? Facebook

? Instagram

CategoriesFlutter

Storing in database with Flutter

Storing text in the Database is one of the most current operations that we, as developers, are going to do. Sometimes we need to save the data from the server so the users can open the app and if there’s data already stored we can show that first, or if we want to implement an have an offline mode.

Today we’re going to see how to store data in Flutter. Our app is going to be a Todo app, where we store these todos to watch them later.

What we’re going to need:

  • A Todo Class.
  • A Screen, which let us create the Todo.
  • Add the dependency for Sqflite.
  • A DatabaseHelper which is a class that contains the logic of the Database.

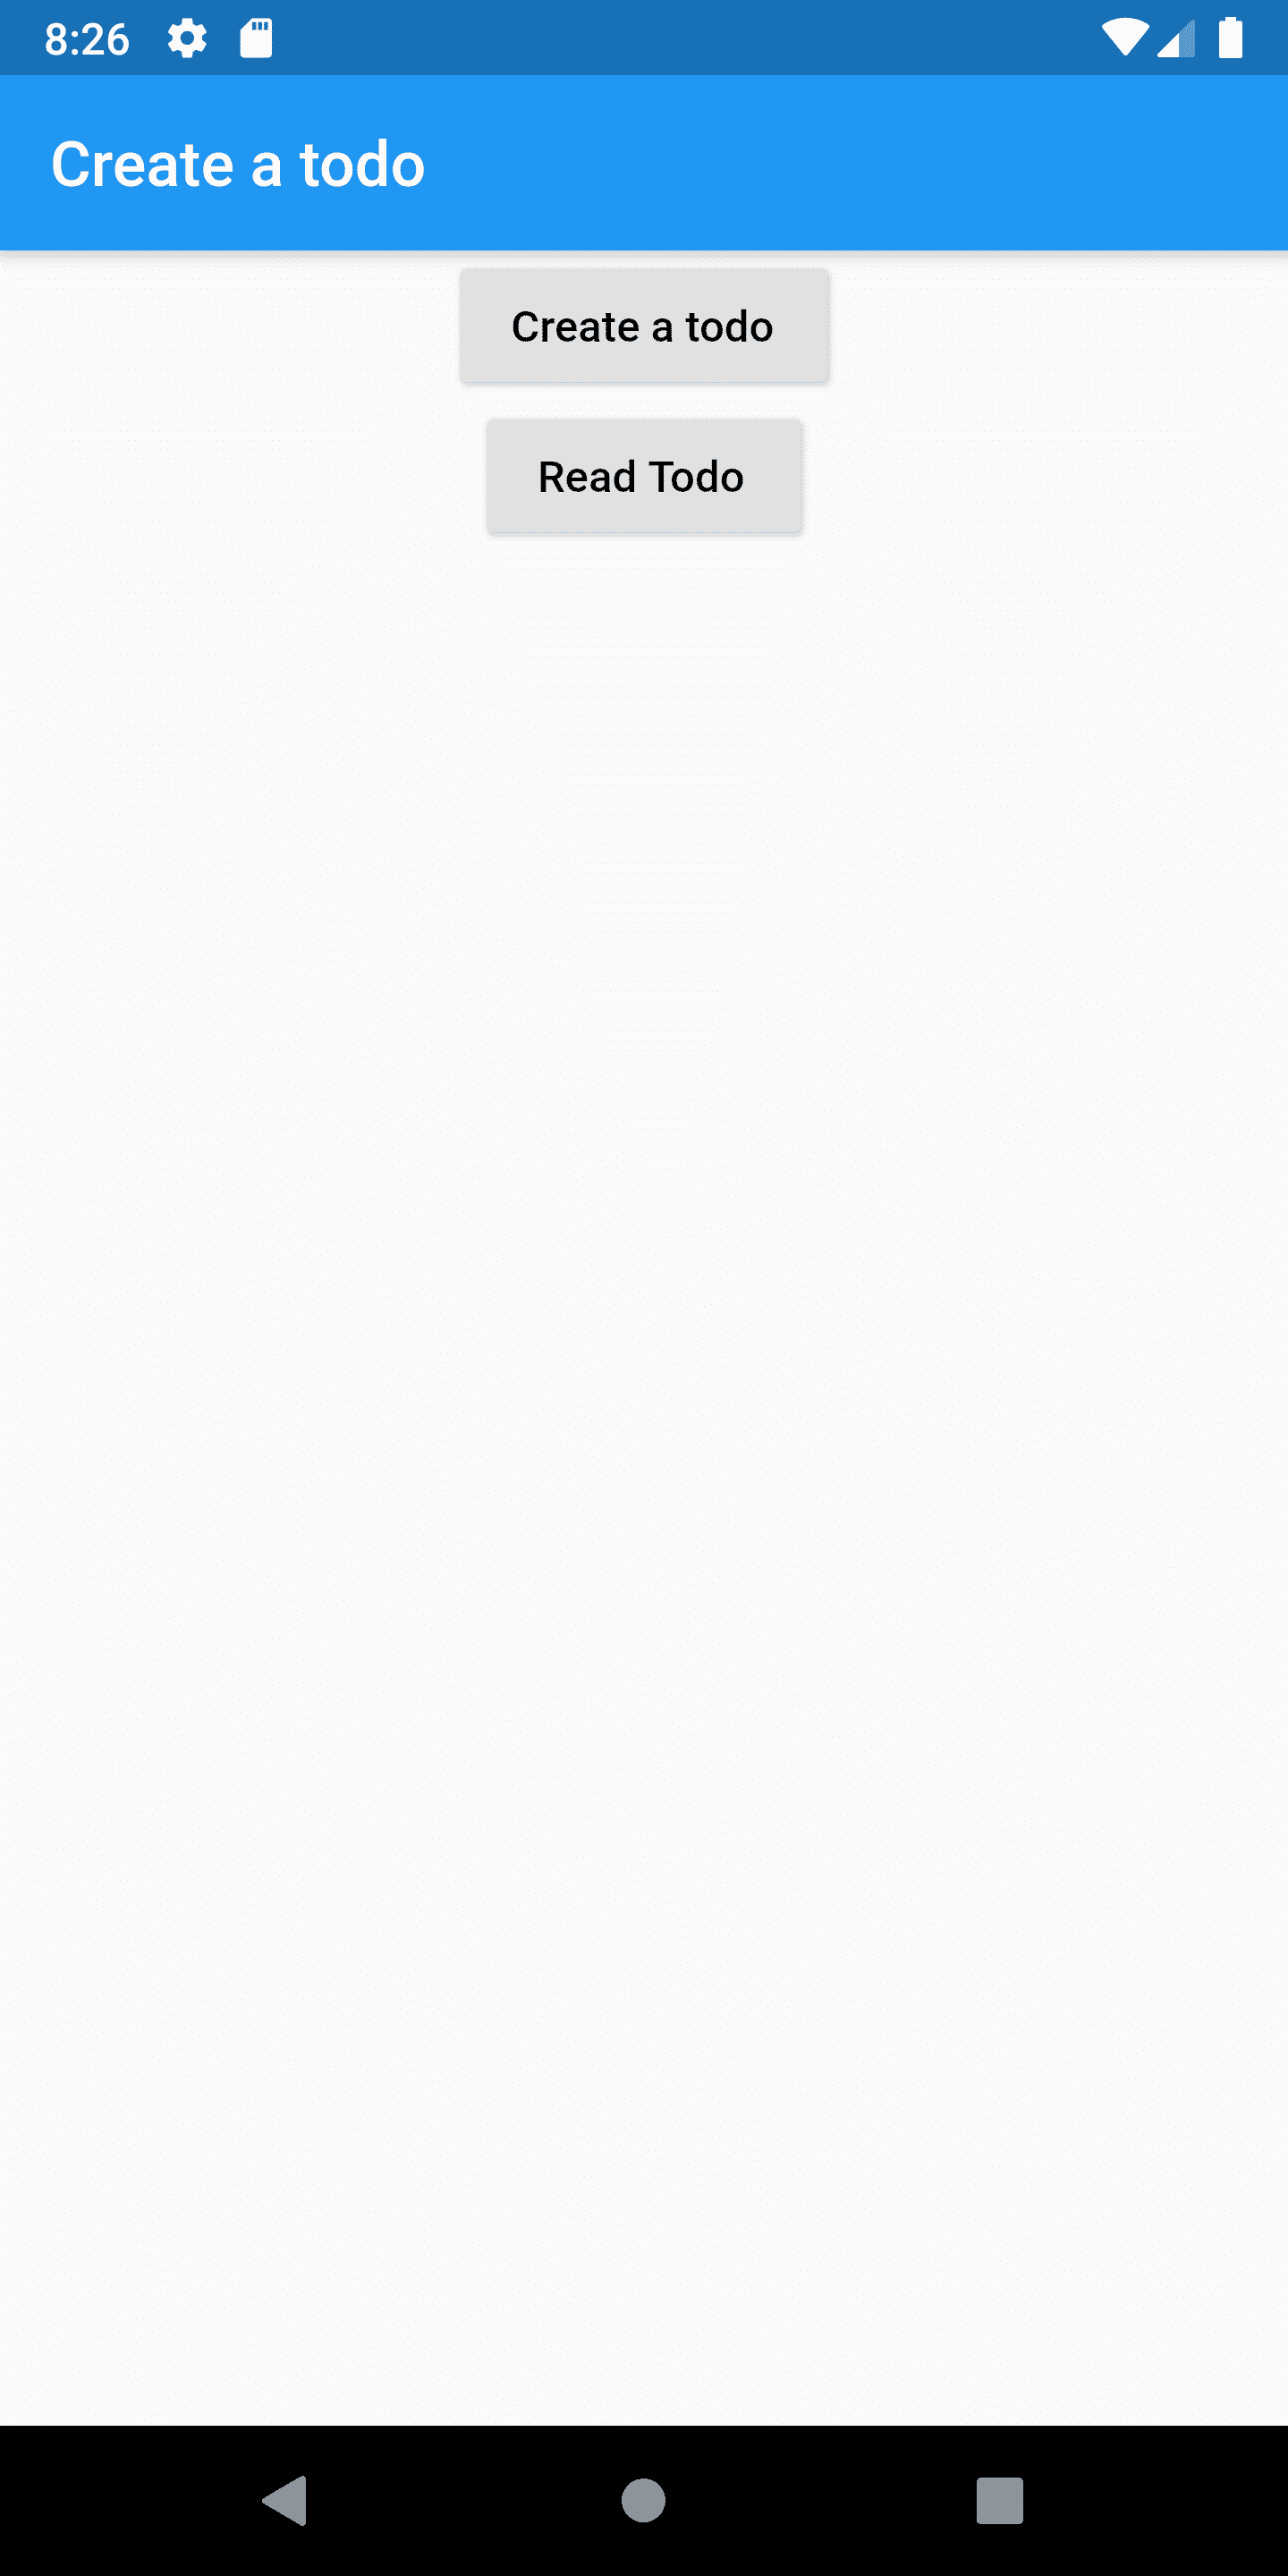
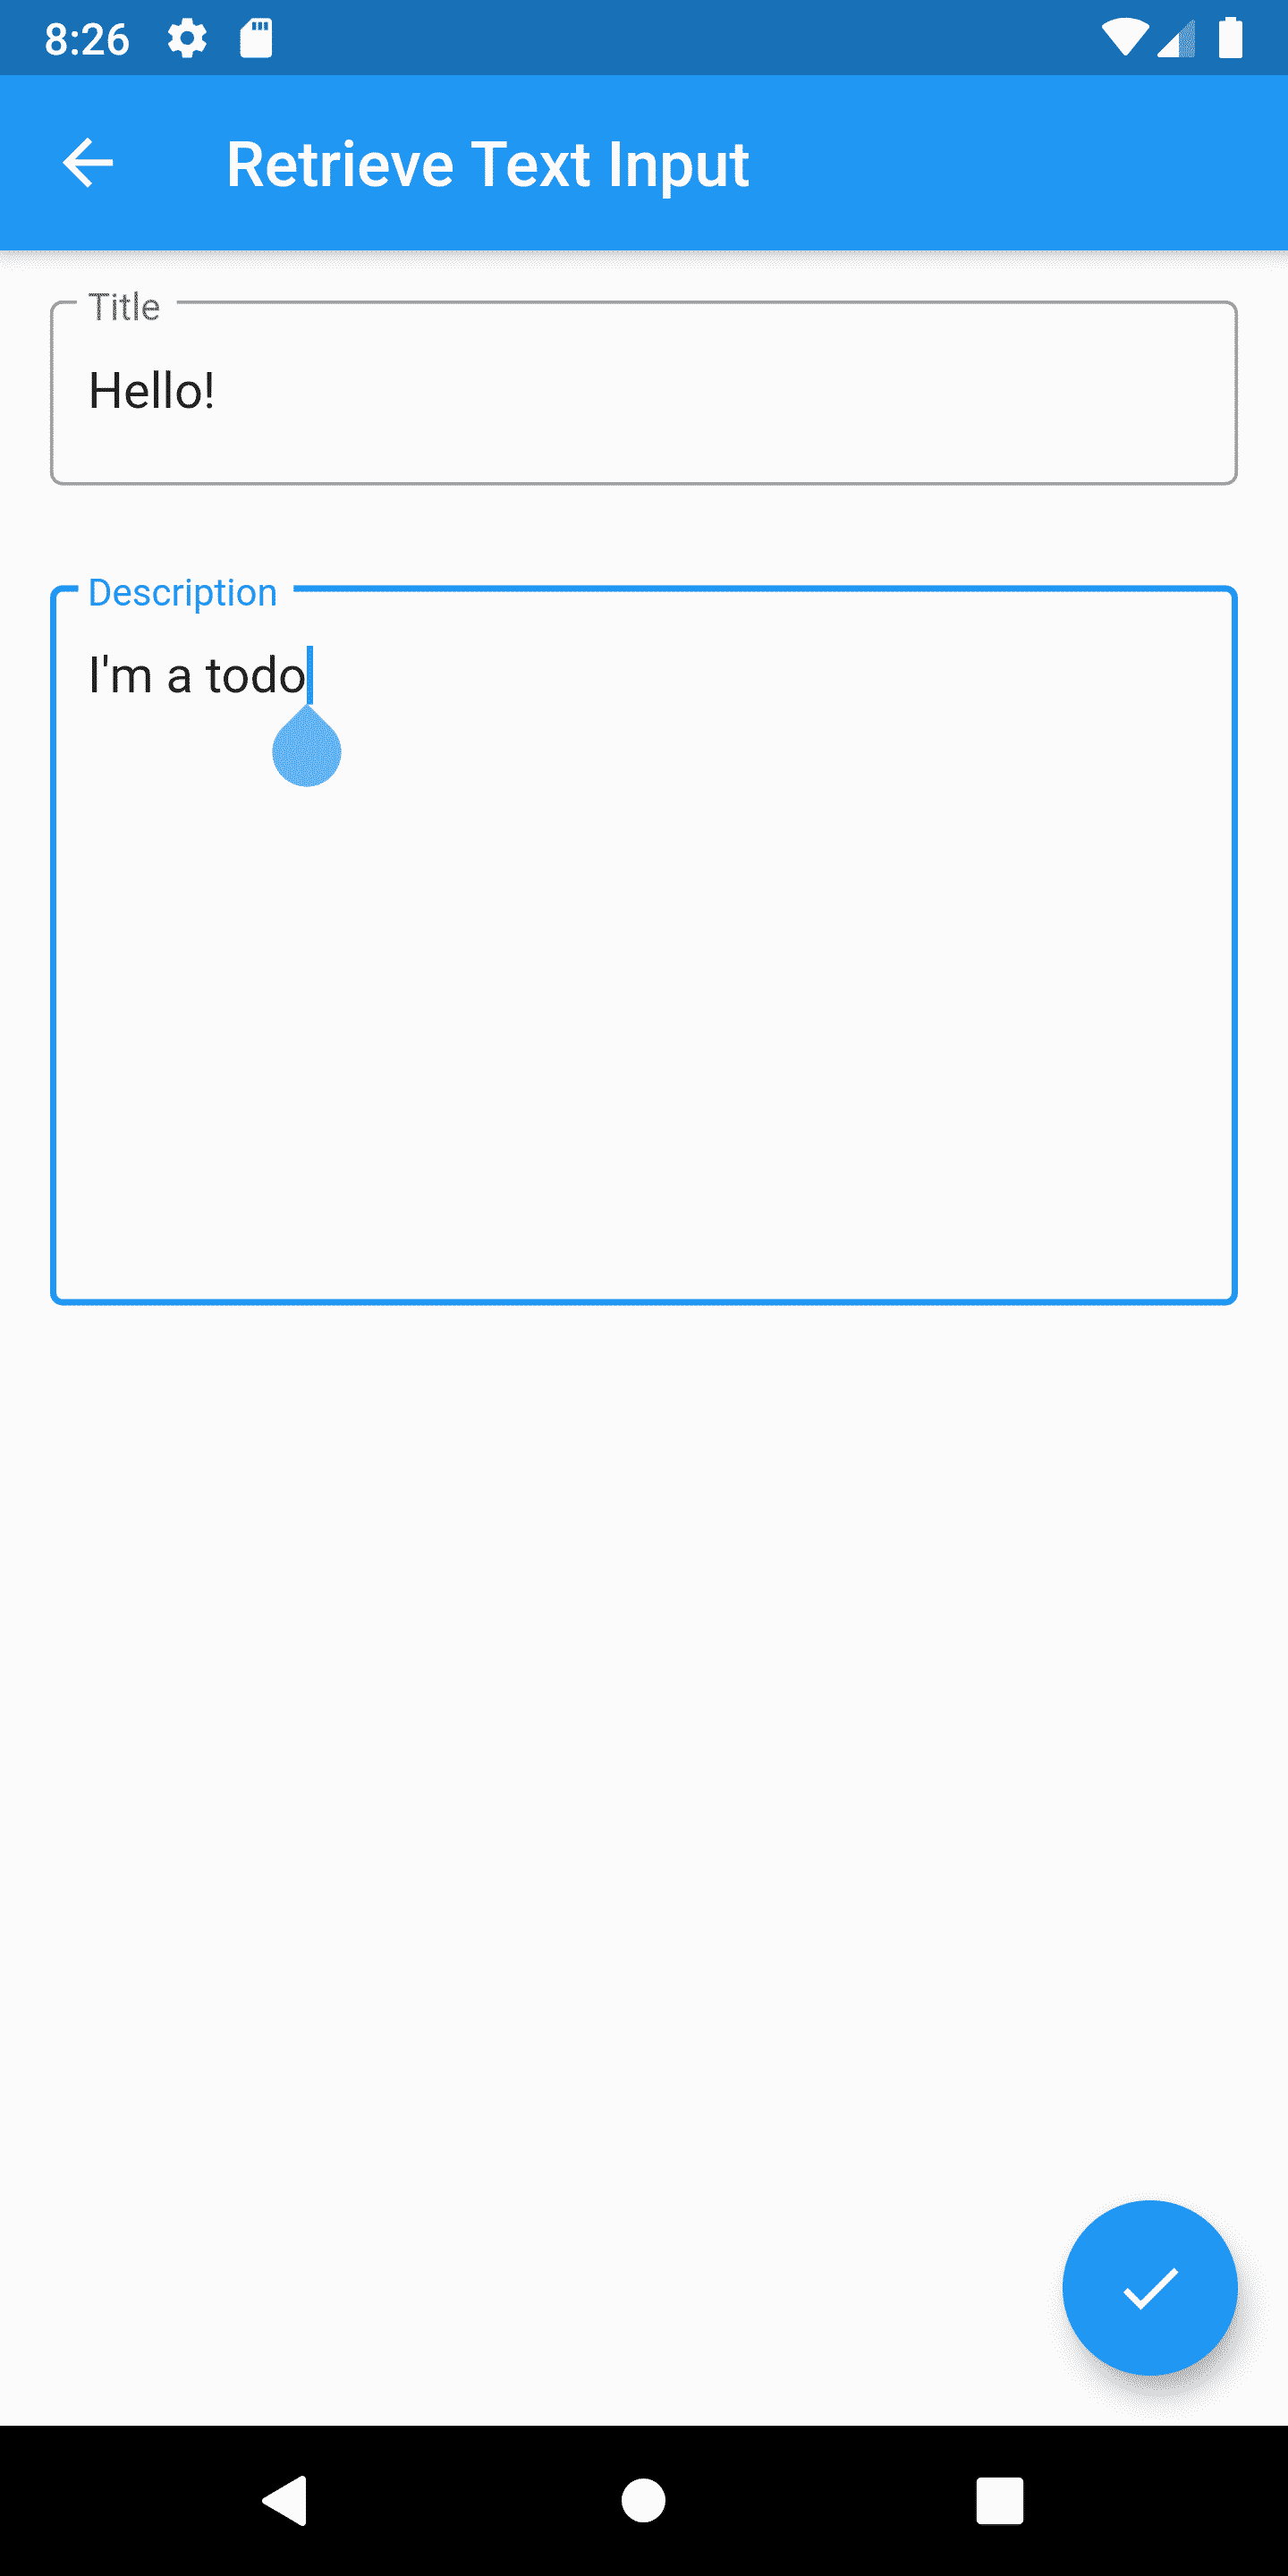
https://www.codingpizza.com/wp-content/uploads/2020/01/Screenshot_1578338767.png

First, we’re going to create our Todo class:

class Todo {
  final int id;
  final String content;
  final String title;
  static const String TABLENAME = "todos";

  Todo({this.id, this.content, this.title});

  Map<String, dynamic> toMap() {
    return {'id': id, 'content': content, 'title': title};
  }
}

This is the Todo Class which has a content and a title as properties.

Before creating our DatabaseHelper, we’re going to add our dependencies to the pubspec.yml to do that we need to add the following lines below the flutter dependency.

dependencies:
  flutter:
    sdk: flutter
  sqflite:
  path:

Now we’re going to create our DatabaseHelper, which is going to manage the Database for us.

class DatabaseHelper {
  //Create a private constructor
  DatabaseHelper._();

  static const databaseName = 'todos_database.db';
  static final DatabaseHelper instance = DatabaseHelper._();
  static Database _database;

  Future<Database> get database async {
    if (_database == null) {
      return await initializeDatabase();
    }
    return _database;
  }

  initializeDatabase() async {
    return await openDatabase(join(await getDatabasesPath(), databaseName),
        version: 1, onCreate: (Database db, int version) async {
      await db.execute(
          "CREATE TABLE todos(id INTEGER PRIMARY KEY AUTOINCREMENT NOT NULL, title TEXT, content TEXT)");
    });
  }
}

There’s a lot of things going on there. Let’s explain them. Accessing a database is an asynchronous operation, which means we must use Futures to initialize the database property. In the function InitializeDatabase, we’re going to create a database using the openDatabase function from the Sqlite library we added before, and we must pass the following parameters.

  • A join function with the databasesPath(), which is the path of the Database in their respective OS (Android, iOS) and the database name, which is a constant we already defined.
  • An anonymous function that is going to be executed when the onCreate status is reached and inside of that function a query to be executed. In this example a query to create a Table.

The insertTodo() function is a function that takes a Todo as a parameter and retrieves our previously created Database.

Then we call the insert() function, which takes three parameters:

  • The name of the table in which it’s going to insert that data, in our case is already defined in our Todo class.
  • A map, which is the data we want to insert. For this, we have our toMap function, which converts our Todo object to a Map.
  • A constant to decide which algorithm to use when the Database found the same Todo twice, in our case, we’re going to use the replace one.

Finally, we can create our Screen to fill our Todo object. Since the fields are editable, the Widget must be a StatefulWidget, so we create our StatefulWidget with its respective State. The widgets that we’re going to use are the TextFields and a FloatingActionButton to save the Todo.

class CreateTodoScreen extends StatefulWidget {

  @override
  State<StatefulWidget> createState() {
    return _CreateTodoState();
  }
}

class CreateTodoScreen extends StatefulWidget {

  @override
  State<StatefulWidget> createState() {
    return _CreateTodoState();
  }
}

class _CreateTodoState extends State<CreateTodoScreen> {
  final descriptionTextController = TextEditingController();
  final titleTextController = TextEditingController();

  @override
  void dispose() {
    super.dispose();
    descriptionTextController.dispose();
    titleTextController.dispose();
  }

  @override
  Widget build(BuildContext context) {
    return Scaffold(
      appBar: AppBar(
        title: Text('Retrieve Text Input'),
      ),
      body: Column(
        children: <Widget>[
          Padding(
            padding: const EdgeInsets.all(16.0),
            child: TextField(
              decoration: InputDecoration(
                  border: OutlineInputBorder(), labelText: "Title"),
              maxLines: 1,
              controller: titleTextController,
            ),
          ),
          Padding(
            padding: const EdgeInsets.all(16.0),
            child: TextField(
              decoration: InputDecoration(
                  border: OutlineInputBorder(), labelText: "Description"),
              maxLines: 10,
              controller: descriptionTextController,
            ),
          ),
        ],
      ),
      floatingActionButton: FloatingActionButton(
          child: Icon(Icons.check),
          onPressed: () {
            DatabaseHelper().insertTodo(Todo(
                title: titleTextController.text,
                content: descriptionTextController.text));
            Navigator.pop(context, "Your todo has been saved.");
          }),
    );
  }
}

To retrieve the data from the TextField, we’re going to use TextEditingControllers, which we initialize in the CreateTodoState after that we override the function dispose of the CreateTodoState and call the dispose function of each controller.

Lately, when we create our TextField, we pass their respective controller as a parameter. Finally, in the FloatingActionButton onPressed parameter, we pass an anonymous function, which calls our DatabaseHelper and inserts the Todo object.

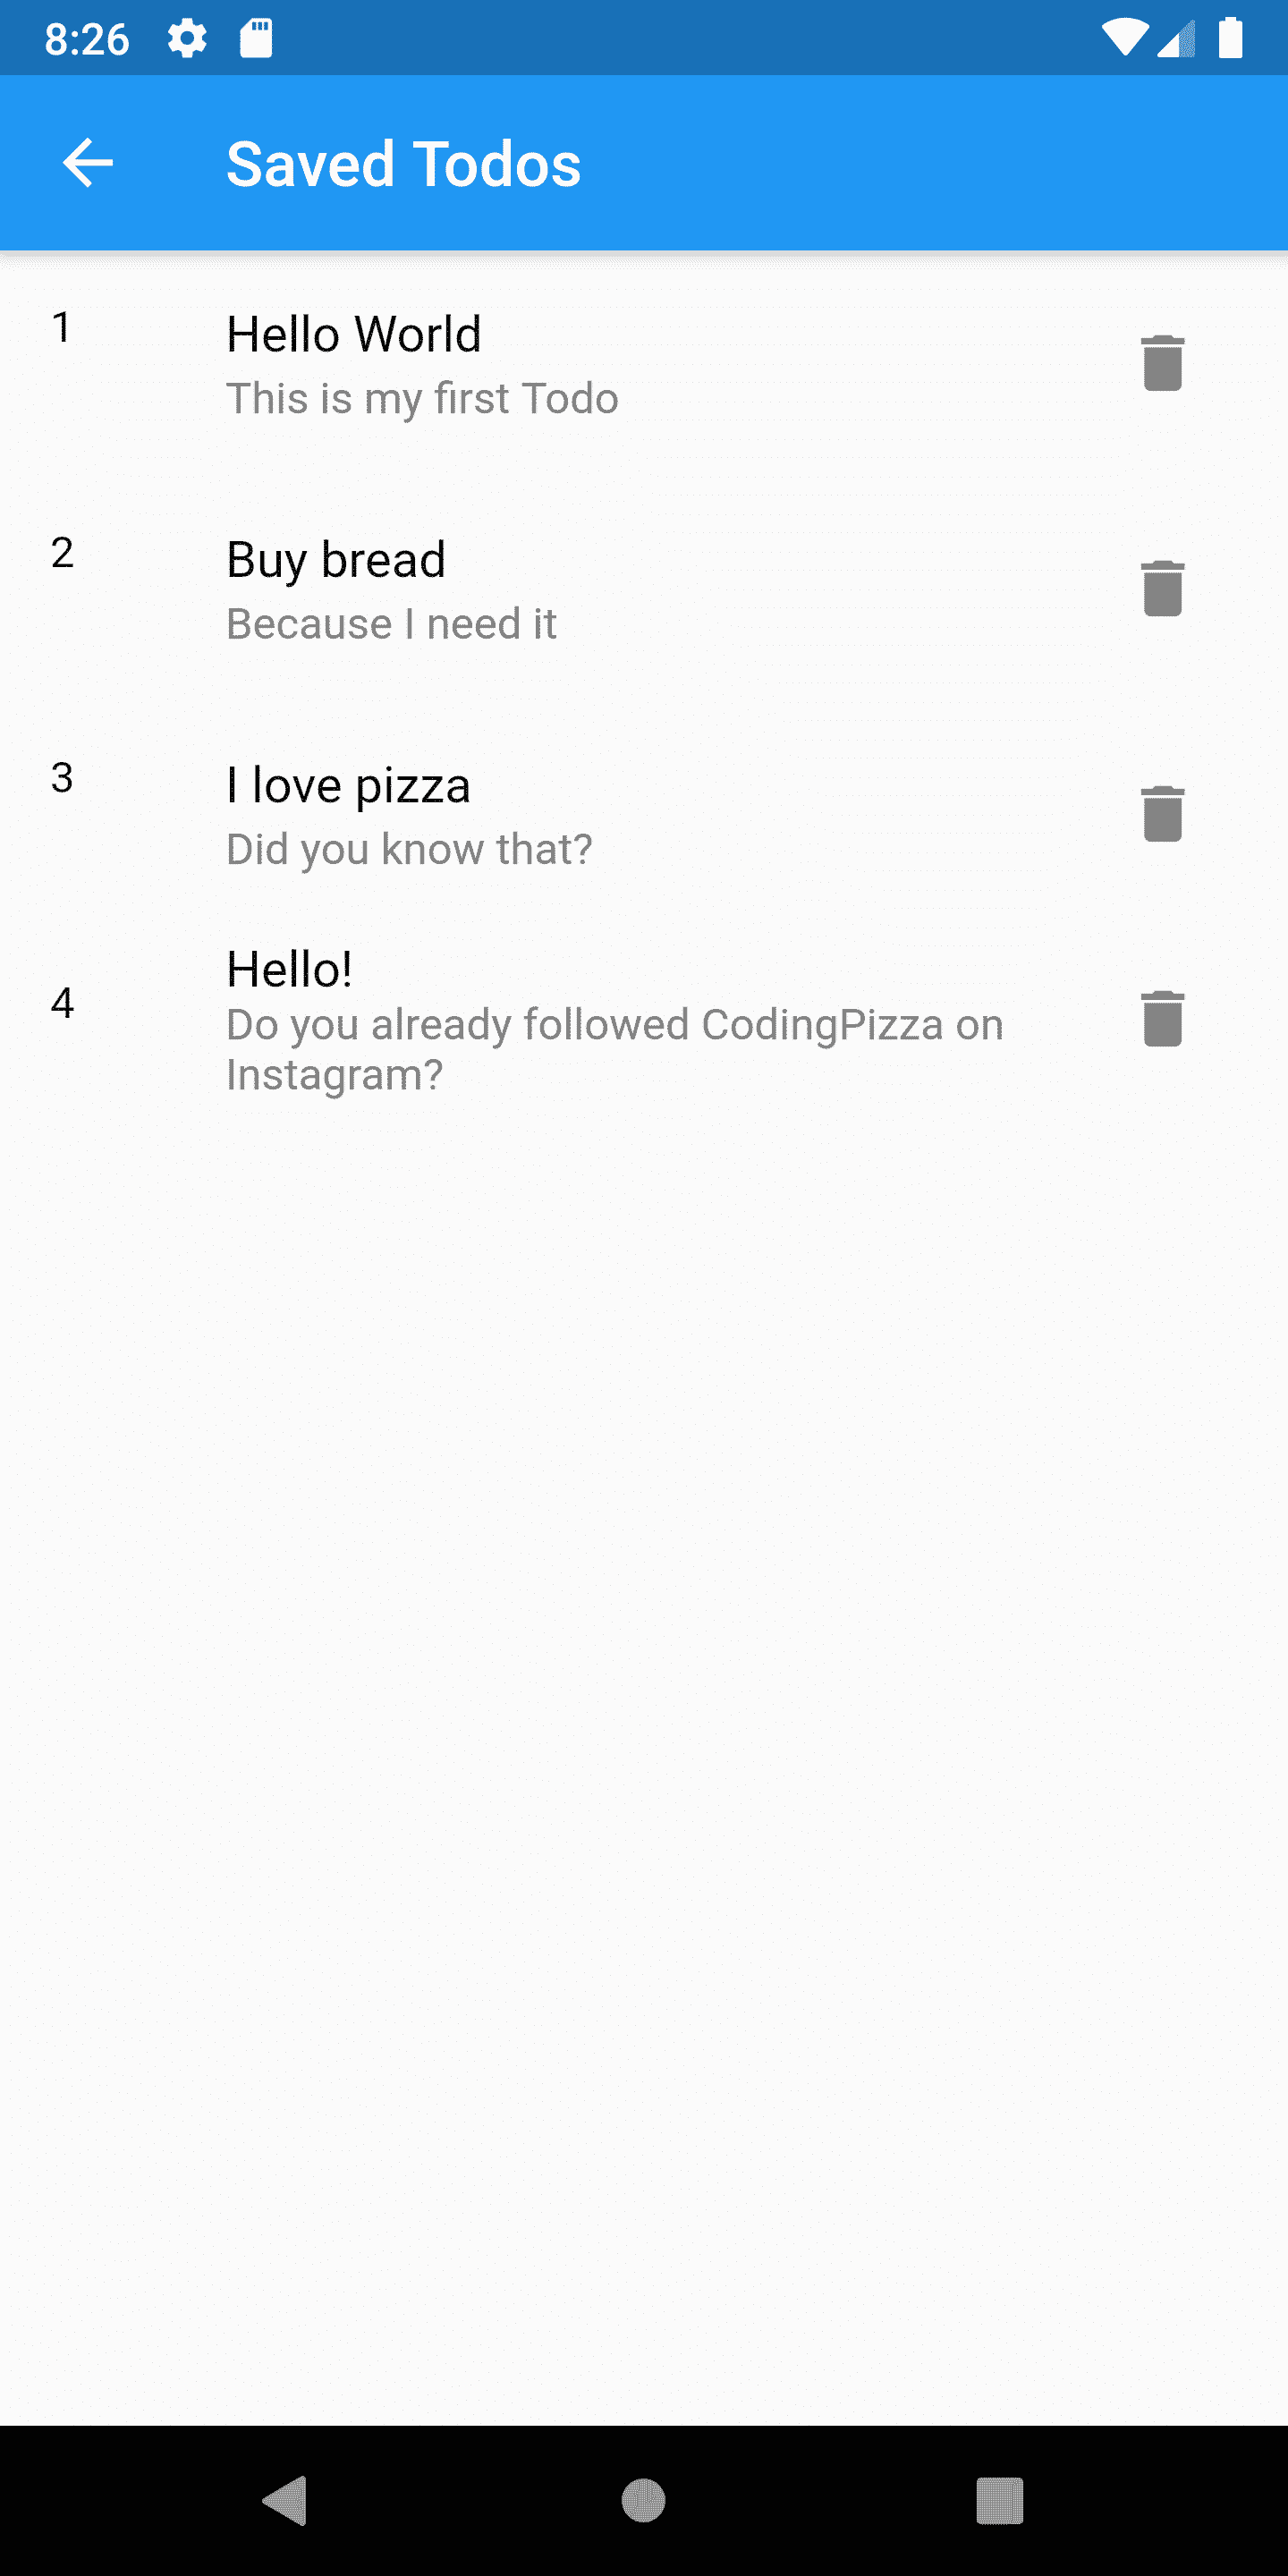
https://www.codingpizza.com/wp-content/uploads/2020/01/Screenshot_1578338787.png

Retriving the Todo’s from the database.

What we’re going to do first is to add another Button to our HomeScreen. For that, let’s create a new Widget called ReadTodoButton. This Widget returns a RaisedButtonWidget, which has an onPressed function that uses the Navigator to send us to the next screen, which is the ReadTodoScreen, we’re going to create this screen in the future.

The ReadTodoButton Widget is going to look like this:

class ReadTodoButton extends StatelessWidget {
  @override
  Widget build(BuildContext context) {
    return RaisedButton(
      onPressed: () {
        _navigateToReadTodoScreen(context);
      },
      child: Text("Read Todo"),
    );
  }

  _navigateToReadTodoScreen(BuildContext context) async {
    Navigator.push(
      context,
      MaterialPageRoute(builder: (context) => ReadTodoScreen()),
    );
  }
}

Then we’re going to add it to the children’s array of our HomeScreen Widget. And the result would be this:

class HomeScreen extends StatelessWidget {
  @override
  Widget build(BuildContext context) {
    return Scaffold(
      appBar: AppBar(
        title: Text('Create a todo'),
      ),
      body: Column(
        children: <Widget>[
          Center(child: CreateTodoButton()),
          Center(child: ReadTodoButton())
        ],
      ),
    );
  }
}

Now we’re going to add a new function in our DatabaseHelper class, which is going to return the previously saved Todo’s. First, we’re going to create a function that returns a list of Todo items wrapped in a Future object, and since it returns a Future, that function should include the async reserved keyword in their signature.

Future<List<Todo>> retrieveTodos() async {
    // Logic we will add later
}

Then we will retrieve our Database object, and since it is an async operation, we’re going to use the await keyword.

final Database db = await database;

The next step we’re going to do is create a list of maps that have a key which is a String and a value that is going to be dynamic, we obtain that value from a query function of the database. It will look as follows.

final List<Map<String, dynamic>> maps = await db.query(Todo.TABLENAME);

In the database query function, we’re going to pass the name of the table, which is defined in our Todo object.

In the last step we need to convert that List of maps into a List of Todos. To do that, we need to create a list using the generate function which takes two parameters, the size of the List and an anonymous function.

In the last step, we need to convert that list of maps into a List of Todos. For that we would need to create a list using the generate function which takes two parameters, the size of the list and an anonymous function.

For the size of the list we can use the maps.length, which gives us the length that we’re going to need. For the anonymous function, we need to create a function that returns a Todo for each element of the list.

The code will look like this:

return List.generate(maps.length, (i) {
      return Todo(
        id: maps[i]['id'],
        title: maps[i]['title'],
        content: maps[i]['content'],
      );
    });

We take the id, title, and content from the maps variable, then we assign it to our new Todo object.

With that function, we finally have a function that returns our Todo’s object. The only thing left is creating a new screen, which shows the Todo’s.

To create our ReadTodoScreen, we’re going to create a Stateless Widget, which has a List as a Body . But since we’re going to retrieve the data from a Future, we need to wrap our list in a FutureBuilder.

A FutureBuilder is a widget that requires a generic which is declared inside angle brackets, and requires as a parameter a Future and the Builder.

We’re going to pass as a Future the function of our Database Helper, and as a builder, an anonymous function that needs the context and a snapshot, and the anonymous function return a Widget.

Inside the anonymous function, we must check if the snapshot (The object which contains the Todo’s) has data using the .hasData() function. If it has, we’re going to return a new ListView widget, otherwise, we’re going to show a text with a message that says, “Oops!”.

We must also return a CircularProgressIndicator to show while the operation is ongoing.

The code of the screen is the following:

class ReadTodoScreen extends StatelessWidget {
  @override
  Widget build(BuildContext context) {
    return Scaffold(
      appBar: AppBar(
        title: Text('Saved Todos'),
      ),
      body: FutureBuilder<List<Todo>>(
        future: DatabaseHelper().retrieveTodos(),
        builder: (context, snapshot) {
          if (snapshot.hasData) {
            return ListView.builder(
              itemCount: snapshot.data.length,
              itemBuilder: (BuildContext context, int index) {
                return ListTile(
                  title: Text(snapshot.data[index].title),
                  subtitle: Text(snapshot.data[index].content),
                );
              },
            );
          } else if (snapshot.hasError) {
            return Text("Oops!");
          }
          return CircularProgressIndicator();
        },
      ),
    );
  }
}

Note: The ListView.Builder function requires the size of the list that is going to be displayed and a Widget that is each tile of the list.

Updating the Todo’s

To update our Todo’s, we need to make certain modifications. First, we’re going to add this new function to the DatabaseHelper.

updateTodo(Todo todo) async {
    final db = await database;

    await db.update(Todo.TABLENAME, todo.toMap(),
        where: 'id = ?',
        whereArgs: [todo.id],
        conflictAlgorithm: ConflictAlgorithm.replace);
  }

In this function, we obtain the Database, then we call the function update() from the Database, and we pass the next parameters.

  • The tablename we previously defined in our Todo object.
  • The Todo object converted into a map using the toMap function.
  • The where parameter. Which is the clause to apply the changes. In our case, we want to use the id.
  • The whereArgs parameter which is going to replace the “?” sign in the where clause.
  • And finally, a Constant that specifies the algorithm to use in case there is a conflict.

At this time, we need to update our UI. First, we’re going to modify our DetailTodoScreen to allow us to edit our Todo. We need to add a Todo as an optional parameter in our DetailTodoScreen constructor, then create a final Todo property in our Widget, and since it is a StatefulWidget, pass it to the State.

class DetailTodoScreen extends StatefulWidget {
    final Todo todo;

  const DetailTodoScreen({Key key, this.todo}) : super(key: key);

  @override
  State<StatefulWidget> createState() => _CreateTodoState(todo);
}

In our State we need to add the Todo as a parameter in the constructor, create the Todo property and override the initState in which we’re going to set the title and the description if the Todo exists.

class _CreateTodoState extends State<DetailTodoScreen> {
  Todo todo;
  final descriptionTextController = TextEditingController();
  final titleTextController = TextEditingController();

  _CreateTodoState(this.todo);

  @override
  void initState() {
    super.initState();
    if (todo != null) {
      descriptionTextController.text = todo.content;
      titleTextController.text = todo.title;
    }
  }

Finally, in the onPressed anonymous function, we need to call a new function, which is saveTodo, that is going to call the DatabaseHelper updateTodo function if we passed a previously created Todo. Otherwise, it will insert a new Todo in our Database. Finally, in the same onPressed anonymous function, we’re going to call the setState function.

This is how our State is going to look.

class _CreateTodoState extends State<DetailTodoScreen> {
  Todo todo;
  final descriptionTextController = TextEditingController();
  final titleTextController = TextEditingController();

  _CreateTodoState(this.todo);

  @override
  void initState() {
    super.initState();
    if (todo != null) {
      descriptionTextController.text = todo.content;
      titleTextController.text = todo.title;
    }
  }

  @override
  void dispose() {
    super.dispose();
    descriptionTextController.dispose();
    titleTextController.dispose();
  }

  @override
  Widget build(BuildContext context) {
    return Scaffold(
      appBar: AppBar(
        title: Text('Retrieve Text Input'),
      ),
      body: Column(
        children: <Widget>[
          Padding(
            padding: const EdgeInsets.all(16.0),
            child: TextField(
              decoration: InputDecoration(
                  border: OutlineInputBorder(), labelText: "Title"),
              maxLines: 1,
              controller: titleTextController,
            ),
          ),
          Padding(
            padding: const EdgeInsets.all(16.0),
            child: TextField(
              decoration: InputDecoration(
                  border: OutlineInputBorder(), labelText: "Description"),
              maxLines: 10,
              controller: descriptionTextController,
            ),
          ),
        ],
      ),
      floatingActionButton: FloatingActionButton(
          child: Icon(Icons.check),
          onPressed: () async {
            _saveTodo(titleTextController.text, descriptionTextController.text);
            setState(() {});
          }),
    );
  }

  _saveTodo(String title, String content) async {
    if (todo == null) {
      DatabaseHelper.instance.insertTodo(Todo(
          title: titleTextController.text,
          content: descriptionTextController.text));
      Navigator.pop(context, "Your todo has been saved.");
    } else {
      await DatabaseHelper.instance
          .updateTodo(Todo(id: todo.id, title: title, content: content));
      Navigator.pop(context);
    }
  }
}

Deleting a Todo

To delete a Todo, we need to add the delete function to our DatabaseHelper.

deleteTodo(int id) async {
    var db = await database;
    db.delete(Todo.TABLENAME, where: 'id = ?', whereArgs: [id]);
  }

This function calls the delete function from the Sqflite library in which we pass the table name, the where clause, and the id of the Todo.

Then in our UI, we’re going to add a delete button in our Todo List. In our ListTile Widget, we’re going to pass as a trailing parameter an IconButton Widget. Finally, in the onPressed parameter, we’re going to add an anonymous function that calls the deleteTodo from the DatabaseHelper class.

class  ReadTodoScreen extends StatefulWidget {
  @override
  _ReadTodoScreenState createState() => _ReadTodoScreenState();
}

class _ReadTodoScreenState extends State<ReadTodoScreen> {
  @override
  Widget build(BuildContext context) {
    return Scaffold(
      appBar: AppBar(
        title: Text('Saved Todos'),
      ),
      body: FutureBuilder<List<Todo>>(
        future: DatabaseHelper.instance.retrieveTodos(),
        builder: (context, snapshot) {
          if (snapshot.hasData) {
            return ListView.builder(
              itemCount: snapshot.data.length,
              itemBuilder: (BuildContext context, int index) {
                return ListTile(
                  title: Text(snapshot.data[index].title),
                  leading: Text(snapshot.data[index].id.toString()),
                  subtitle: Text(snapshot.data[index].content),
                  onTap: () => _navigateToDetail(context, snapshot.data[index]),
                  trailing: IconButton(
                      alignment: Alignment.center,
                      icon: Icon(Icons.delete),
                      onPressed: () async {
                        _deleteTodo(snapshot.data[index]);
                        setState(() {});
                      }),
                );
              },
            );
          } else if (snapshot.hasError) {
            return Text("Oops!");
          }
          return Center(child: CircularProgressIndicator());
        },
      ),
    );
  }
}

_deleteTodo(Todo todo) {
  DatabaseHelper.instance.deleteTodo(todo.id);
}

_navigateToDetail(BuildContext context, Todo todo) async {
  Navigator.push(
    context,
    MaterialPageRoute(builder: (context) => DetailTodoScreen(todo: todo)),
  );
}

https://www.codingpizza.com/wp-content/uploads/2020/01/Screenshot_1578338793.png

That’s it! We now have an app that can store a Todo, read it from the database, update it, and delete it.

The code is available here. Thanks for reading! If you don’t want to miss any of this post, don’t forget to follow me!

Instagram: www.instagram.com/codingpizza
Twitter: www.twitter.com/coding__pizza
Facebook: www.facebook.com/codingpizza
Site: www.codingpizza.com

CategoriesDart

How Classes works in Dart

Hi! We’ve been learning about Dart for some weeks, if you’ve been following this series, you know we learned a lot of topics. In this post we’re going to talk about Classes in Dart, the Classes are one of the basics of programming.

? What is a Class

A class is the object blueprint. Inside the class, we can find their properties, constructors, and functions. We already talked about functions in Dart, so we’re going to skip that part.

Properties

The class properties are variables declared inside the class. For example, if we have a class named Car, the car color can be a string variable with the value “Blue.”

Constructors

The constructors help us to initialize and set the values of our object. When we create a class and pass some variable as a parameter, we’re using a constructor.

? How to create a Class in Dart

To create a Class in Dart, we need to use the reserved keyword class and then the name of the Class. For example:

class Dog {

}

With this, we can create any Dog we want. But there’s more our Dog needs a name, so let’s create a variable that assigns that name.

class Dog {
  String name = "Rocky";
}

That’s great! Now every time we create a new Dog, it’s going to have Rocky as the name. Now we need to add our dog’s ability to bark. For that, we need to create a function.

class Dog {
  String name = "Rocky";

  void bark(){
    print("Woof Woof! ?");
  }
}

We already have a blueprint for a Dog named Rocky who can bark. All we need to do is create an object from this blueprint is use the constructor.

var MyDoggo = Dog();

The previous example shows us how we can create a Dog object using a default constructor. But what if we want to create another dog with another name? Not all dogs are named Rocky.

? Creating uniques dogs with constructors

To assign the name of our Dogs, we need to create a Constructor inside the class, which can help us to initialize our Dog objects with their name.

class Dog {
  String name = "Rocky";

  Dog(this.name)

  void bark(){
    print("Woof Woof! ?");
  }
}

Now we can create our Dogs using the following code.

var doggo = Dog("Sparky");
doggo.bark();

There are more Constructors. We’re going to talk about those in the next CodingSlices Extended. Remember to follow me, so you don’t miss it.

? Finally, here is a spooky dog.

That’s it

I hope you liked it. Do you want to learn more? I’m also creating new CodingSlices about Flutter on Instagram, feel free to follow me in @codingpizza for more content.

I’m also writing an eBook, which is a basic course of Dart. It’s about all you need to know to get started with Flutter. It’s free, and you can sign-up here.

Now is your turn

You can try these concepts in IDE like Intellij idea community, which is free. All you need is to install the Dart plugin. Visual Studio Code or in some online editors like Dartpad.

Previous post

If you’re interested in more posts like this, you can check out my others post about Dart.

Variables

Functions

Parameters

Control flow

Collections

Powerful list functions in dart that you should know


CategoriesDart

Powerful list functions in Dart that you should know

Powerful list functions in Dart that you should know

In the previous post about Dart, we talked about Collections in Dart. We spoke about List, Maps, and sets. And today, we’re going to talk about some functions that are awesome and can help you in many cases.

Note: In this post we use in various cases the anonymous function, if you are not familiarized with it, you can check my other post about functions.

Map

The map function exists in many programming languages, and Dart is not an exception. This function creates a new list after transform every element of the previous list. This function takes as a parameter an anonymous function. Let’s see an example.

var list = List.of({1,2,3,4});
var mappedList = list.map( (number) => number *2);
print(mappedList);

In this example, we create an anonymous function that has a number as a parameter, and we multiply that number per two. The result of this function is:
(2,4,6,8)

Sort

Sometimes you receive a list from the server, and you need to show it to the user. But what if you need to apply some filter and sort it in an ascending way? Well, this function can help you. Let’s see an example.

var randomNumbers = List.of({14, 51, 23, 45, 6, 3, 22, 1});
randomNumbers.sort();
print(randomNumbers);

This is the result.

[1, 3, 6, 14, 22, 23, 45, 51]

Generate

This function is great when you need to create a list of numbers for a test. It takes as first parameter a number, which indicates the size of the list and an anonymous function which tells the generate() function how to create the numbers inside the list.

Here’s an example.

var generatedList = List.generate(10, (number) => number * Random().nextInt(50));
  print(generatedList);

In the example we can see how we can generate a list of ten elements and multiply it by a random number from 0 to 50.

Take

The take function literally takes the first elements from the list. This can be useful when you have a list of winners and want to take the top 3. Here’s how you can use it.

var list = List.from([1,2,3,4,5,6]);
var topThreeList = list.take(3);
print(topThreeList);

The result of this example is: 1,2,3

Skip

The skip function is the opposite of the take function. This function ignores the first elements and creates a list of the remaining ones. This example shows how you can use it.

var list = List.from([1,2,3,4,5,6]);
var skipList = list.skip(3);
print(skipList);

The result is: 4,5,6

Where

This function is one of my favorites. It helps us to create a list of elements that satisfy a predicate. That means that your element list is going to have only elements that meet your requirements. Let’s say that you need to create a list of only even numbers.

var randomNumbers = List.of({14, 51, 23, 45, 6, 3, 22, 1});
var evenNumbers = randomNumbers.where((number => number.isEven));
print(evenNumbers);

The result of this example is 14,6,22.

An awesome tip

These function can be combined to achieve a greater solution. You can combine a where function with a sort function to get the even numbers sorted in ascending way.

var randomNumbers = List.of({14, 51, 23, 45, 6, 3, 22, 1});
var evenNumbers = randomNumbers.where((number) => number.isEven);
evenNumbers = evenNumbers.toList()..sort();
print(evenNumbers);

In this example we take only the even numbers from the randomNumbersList, then we convert these numbers to a List finally we use the cascade operator.. to sort() the list in an ascending way.

The final result is: [6, 14, 22]

That’s it

I hope you liked it. Do you want to learn more? I’m also creating new CodingSlices about Flutter on Instagram, feel free to follow me in @codingpizza for more content.

I’m also writing an eBook, which is a basic course of Dart. It’s about all you need to know to get started with Flutter. It’s free, and you can sign-up here.

Now is your turn

You can try these concepts in IDE like Intellij idea community, which is free. All you need is to install the Dart plugin. Visual Studio Code or in some online editors like Dartpad.

Previous post

If you’re interested in more posts like this, youcan check out my others post about Dart.

Variables

Functions

Parameters

Control flow

Collections


CategoriesDart

Collections in Dart

Hello everyone, this week we’re going to talk about Collections. Collections are a crucial part of every project. As always let’s start with what are Collections.

Collections are objects that groups multiple elements inside of them; a List is one of them.

Let’s say we have a list of lottery numbers. We can create a list from it.

The lotteryNumbers is a List,which is part of Collections. In Dart, we can create a List in different ways.

Using var

You can create a null list using the reserved keyword var and the name of the list.

Null VS Initialized

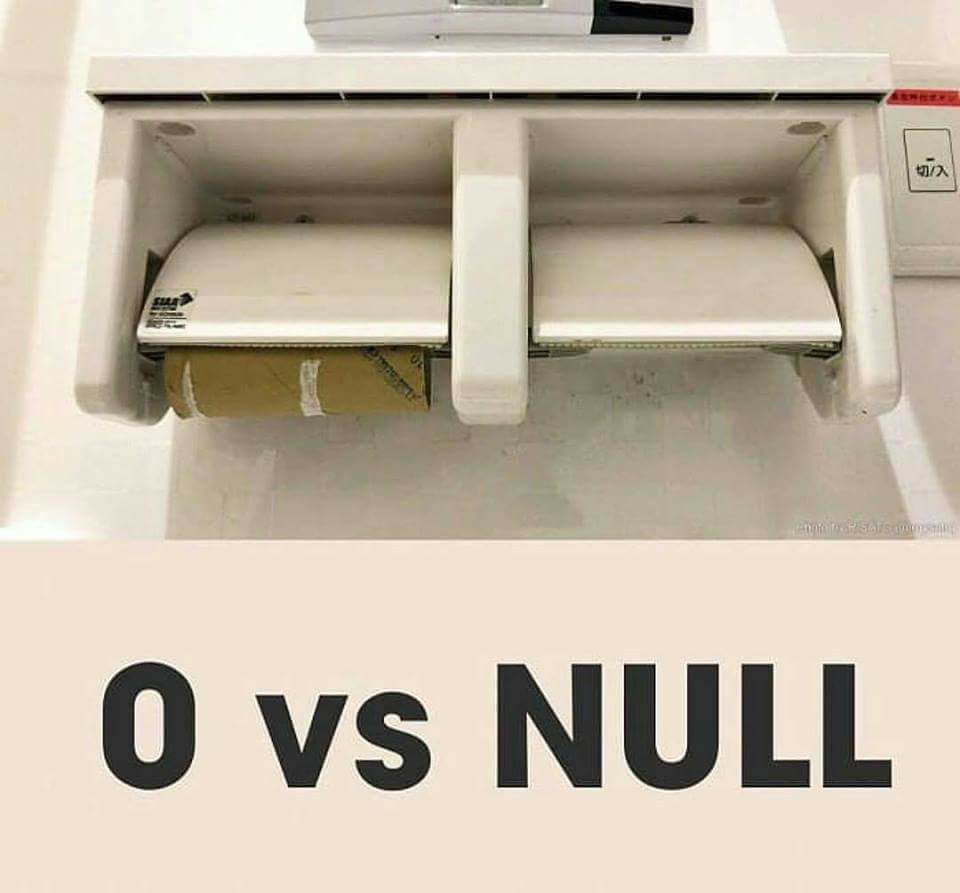
There’s a difference between a null list and an Initialized list. I recently found an image that explains it well.

An empty list is when the list exist but there is not element on it. Null instead means you don’t have a list initialized yet offcourse there’s a more scientific way to explain this, but this is a good example to start.

You can create list as follows.

If you’re curious, you can try to print the size of each list using the .length property and compare the results.

Creating a list for a specific type

If we need to create a list from one specific object type, we need to specify it inside angle brackets in the following way.

In this example we’re creating a list of only String objects.

In case we need to create a list with multiple object types, we need to use the dynamic keyword instead of String.

You can also create a list using the List.of function, we already used this way in the first code snippet.

Retrieving elements from the list

In case you need to retrieve an element. What you need to do is to use brackets beside the List name. This gives you the element from that list in that position. Also you can use the elementAt() function.

Here’s an example:

The result of this example is going to be the first number of that list, in our case the number 1.

Adding an element from the list

This time we’re going to add an element to an already created list. All we need to do is to use the .add function and pass as parameter the number we want to add.

Add items are pretty straightforward

Deleting an element from the list

This time we’re going to do the opposite, we’re going to remove an element from the list. What we need to do is to have the position of the element and use the .removeAt() function.

Which number do you think we removed from this list? If your answer is number 1. You were close, but that’s incorrect, we removed the number 2 because the list position starts from 0.

Value  -> [1,2,3,4,5]
Position->[0,1,2,3,4]

Another type of Collections

Introducing Maps, Maps are unordered key-value pair collection which helps us to associate a key to a value. You can create a map specifying the key type and the value type as follows:

After this reference from the nineties, we can see that each Power Ranger has a dinosaur associated with.

Obtaining an item from a map

Sometimes we need to recall only one of our Zords, how we can do it in a map? All you need to do is indicate the key inside brackets just after the name of the map.

This example returns the Zord of the red ranger.

How to remove a ranger from the map

If you need to remove an element from the map what you need to do is to use the .remove() function and pass as parameter the key. Here’s an example.

How to add a new ranger to our map

When we have a new member in our crew, we need to create a map and then assign it to that map the key and the value only after that we can add that ranger to our map. Here’s an example.

As you can see in this previous example, we created a map with a string key and a string value. Then we assign the key inside the brackets and assign the value “Sabertooth Tiger” to that key.

Last but not least

We can’t talk about Collections without mentioning Sets. A set is an unordered collection of unique objects. Two things worth mentioning about sets are: First, you cannot get an item by index and second, adding a duplicate
item has no effect.

Here’s an example about how to create a set

Remove from the set

If we need to remove an element from the set we can use the function .remove().

Adding an item to the set

When we need to add an item to the set we use the .add() function.

As I mentioned before we can’t add a duplicate object to the Set.

That’s it

If you’re new into programming, I hope this helps you, and if you’re not, I hope you liked it. I’m also creating new CodingSlices about Flutter on Instagram, feel free to follow me in @codingpizza for more content.

I’m also writing an eBook which is a basic course of Dart It’s about all you need to get started with Flutter. It’s free and you can sign-up
here.

Now is your turn

You can try these concepts in IDE like Intellij idea community which is free. All you need is to install the Dart Plugin. Visual Studio Code or in some online editors like Dartpad.

Previous post

If you’re interested in more posts like this, you can check out my others post about Dart.

Variables

Functions

Parameters

Control flow


CategoriesDart

Control flow in Dart

Control Flow

Hi there!, in the last month I’ve been writing about Dart and how things work in this language. If you’re new here, you can check my other post about Dart. I’ll leave it down below.

Variables

Functions

Parameters

Power without control is useless.

In this post, we’re going to talk about how Control Flow, works in Dart. Let’s start with what it is, Control Flow. In simple words is the order in which your code is executed.

Let’s say we need to choose between going outside with an umbrella or not. We check our Weather app, and if it says it’s going to rain we take it with us, otherwise we can leave it at home.

If we want to write that in code, this can be.

if (isGoingToRainToday()) {
 takeUmbrella() 
} else {
 print ("What a great weather today ?")
}

If statements

The if statements help our code to make a decision, it has the following syntax.

if (condition) {
 doThis()
} else {
 doAnotherThing()
}

We start with the reserved keyword if, then we add a condition inside the parentheses. If that condition is met the code inside the first curly braces is going to be executed. Otherwise, the code after the else statement is executed. The condition at the end is a Boolean value; let’s see an example.

In the previous example, we wanted to check the weather to know if we needed to take the umbrella with us. But what isGoingToRainToday() is? Well is a function which returns a boolean. It looks like this.

Boolean isGoingToRainToday() {
	return false
} 

Here’s a tip the else statement is not always needed. If you only need to execute what it is inside the if statement you can omit it.

If you need to make a comparison with more than two options you can also use an else if statement, let’s see how it is.

var flavor = "Vanilla";
if (flavor == "Vanilla"){
	print("Here's your vanilla ice cream");
} else if( flavor == "Chocolate") {
	print("Here's your chocolate ice cream");
} else {
	print("Since we don't know your favorite flavor, here's a random one");
}

In this example we have a favorite flavor of ice cream, the if statement is going to check if the flavor is vanilla if it is not, is going to try the else if condition. If any of the condition mentioned before are met, the else statement is going to be executed.

What happen if we have too many flavors?

Introducing the Switch case

The switch statements work with variables instead of a condition if the switch has a “case” for the value of the variable the code inside that case is going to be executed. If the switch can’t found a case for it, the code inside the default case is executed.
Here’s an example.

var flavor = "Vanilla"
switch (flavor) {
	case "Vanilla":
		print("Here's your vanilla ice cream");
	case "Chocolate":
		print("Here's your chocolate ice cream");
	case "Orange":
		print("Here's your orange ice cream");
	default:
		print("Since we don't know your favorite flavor, here's a random one");
}

The for statement

The for statement is a common statement that exists in almost every language. Is used to iterate an array of objects. The syntax in Dart is as follows:

for (var i = 0; i < list.length; i++){
 print(list[i]);
}

This statement may look confusing but let’s split this declaration, the variable i start at value 0, and it will increase by one until it reaches the length minus one of the list.

For each time the variable increase by one, the code inside the braces is executed. This print that “i object” from the list.

The for statement is useful when you know when it’s going to end. In our case, we now it because list.length is limited.

While statement

The While statement on the other side works better when you don’t know when a condition is going to meet. It will execute the code inside the braces until the condition is met, for example.

int laps = 0;
while (laps < 5){
	print("Laps $laps");
	laps++;
}

In this example, the code inside the while is executed until the laps are less than five.

Laps 0
Laps 1
Laps 2
Laps 3
Laps 4

The sibling of the while is the do while

Introducing the sibling of the While statement, the Do while statement. This statement executes the code and after the statement evaluates it. Here’s an example.

int countDown = 5;
do {
 print("Time remaining: $countDown");
 countDown--;
} while (countDown != 0);

This code is going to print the countDown variable while it’s different than zero. Here’s the result.

Time remaining: 5
Time remaining: 4
Time remaining: 3
Time remaining: 2
Time remaining: 1

That’s it

If you’re new into programming, I hope this helps you, and if you’re not, I hope you liked it. I’m also creating new CodingSlices about Flutter on Instagram, feel free to follow me in @codingpizza for more content.

Do you know I’m also writing an eBook which is a basic course of Dart. All you need to get started with Flutter. It’s free and you can sign-up here.

Now is your turn

You can try these concepts in IDE like Intellij idea community which is free, all you need is to install the Dart Plugin. Visual Studio Code or in some online editors like Dartpad.

Previous post

If you’re interested in more post like this you can check out my others post about Dart.

Variables

Functions

Parameters

CategoriesDart

Parameters in Dart ¿What types exist?

Parameters

Hi there! In the last post, we’ve been talking about variables and functions. If case you missed it, you can check our previous post here.

Variables

Functions

We saw them previously.

On the previous post about functions, we talked about parameters. We saw an example in which we need them as ingredients to do a IceCreamMachine works. We can also say that parameters are dependencies that a function requires to execute their code.

Required parameters

The required parameters are the most basic parameters that a function can use, you specify a type, a name, and you’re ready to go.

We already saw them in the previous post on the sum function example:

The integer a and the integer b, are used inside the function and then are returned.

Optional parameters

These parameters are optional because you can omit them when you use that function. To make a parameter optional, we need to put them inside brackets and at the end of the signature, if you’re using required params. Let’s see an example.

In this function, we can see how the optional parameter is placed before the required parameters if you put the optional parameter first the compiler would complain.

Ok, but what happened with the variable $secondName if it is not passed? The variable is going to be null. We don’t want to print “John null Wick.” for that, we can add a default value that we’re using later in case the optional parameter is null.

To add a default value to an optional parameter, all we need to do is an assignment. You can see it better in the following example:

Now the value is going to be an empty string, and the name will print correctly.

Let’s talk about how we can use the previous function. We actually can use it as follows:

You can make all your parameters optional by wrapping your parameters with brackets, in this way:

Named Parameters

This type of parameters allows you to indicate in the function signature which parameter are you passing into it. For that, we need to surround our parameter with curly braces.

Here’s an example:

In this example, we’re using the name and the surname as required parameters. And the second name as a named parameter and in case nothing is passed to it the value will be an empty string.

When we want to use the last function with the optional parameters, we use it in the following way:

As you can see the named parameter should be included inside the parentheses.

In case we need to have a function with only named parameters, all we need to do is surround all the parameter section in the function signature with curly braces.

With the last function, we can specify the parameters but also change the order in which we use it because the order of the parameters doesn’t matter.

For example:

Isn’t it amazing? The named parameters improve the function readability a lot.

Now is your turn

You can try these concepts in IDE like Intellij idea community which is free, all you need is to install the Dart plugin. Visual Studio Code or in some online editors like Dartpad.

Previous post

If you’re interested in more post like this, you can check out my other articles about Dart.

Variables

Functions

Learn more

If you liked this post, I’m writing more like these in a free ebook which is a basic course of Dart that can help you to later start with Flutter, that awesome framework for develop multiplatform apps. If you’re interested, you can get it for free following this link.

Este sitio web utiliza cookies para que usted tenga la mejor experiencia de usuario. Si continúa navegando está dando su consentimiento para la aceptación de las mencionadas cookies y la aceptación de nuestra política de cookies, pinche el enlace para mayor información.

ACEPTAR
Aviso de cookies